


The aim of this project was to work with Redux Toolkit to manage favourite tv shows and other site settings as users search and find tv shows. The shows users find and add to their favourites are all saved to local storage for future visits.


Here is a screenshot of the homepage of the TVFAVS website I have created:

Don't miss your favourite show!
I made use of TV Mazes great REST API to create a website listing tv shows. You can query the API for schedules, shows, seasons, episodes, cast, crew and all sorts of information.
They have a fuzzy search which deals nicely with typos in show names, returning shows in order of relevancy. Each show has a unique ID and you can query the schedule end point based upon a country code.
Saving state with redux toolkit
I work with "regular Redux" in my day job and I've been excited to try out what the creators of Redux recommend as the way to write Redux - Redux Toolkit.
"Toolkit" makes writing Redux much simpler as you can make use of their createSlice function which handles the work of creating all the actions for you. It also allows you to write mutable code in your reducers whereas regular Redux requires you to write immutable code by spreading existing state before updating it.
To set up our site, a Redux store needs to wrap around the entire app. Doing this allows all the components to access the state saved in Redux no matter where those components are. This is one of the benefits of Redux as it removes the headache of having to "prop drill" the state down into components.
src\index.js
...
import { store } from './app/store';

root.render(
  <React.StrictMode>
    <Provider store={store}>
      <BrowserRouter>
        <App />
      </BrowserRouter>
    </Provider>
  </React.StrictMode>
);
Above you can see the Redux <Provider> component wrapping the app. You will also see a store prop which gets the Redux store.
The store is a place where you list the reducers. Reducers handle all the logic that determines a peice of state. It manages what to do when this state needs updating or requesting.
src\app\store.js
import { configureStore } from '@reduxjs/toolkit';
import favouritesReducer from '../features/favourites/favouritesSlice'
import siteSettingsReducer from '../app/siteSettingsSlice'

export const store = configureStore({
  reducer: {
    favourites: favouritesReducer,
    siteSettings: siteSettingsReducer,
  },
});
In our store we have to pass a reducer object to the configureStore function. This tells the Redux store about all the different reducers for the website.
There's only two reducers to pass in:
favouritesthat handles the favourite shows the user has pickedsiteSettingswhich manages miscellaneous settings like country code and filter by value
Saving state with localStorage
Whilst I'm talking about saving state and the Redux store, I also make use of localStorage to save all this information to the users device so when they leave the website and come back, their favourites and site settings are retrieved from their device automatically and they haven't lost any of their tv shows. Neat!
To do this, I subscribe to the store, destructuring favourites and siteSettings from store.getState(), and then saving it to localStorage. We have to use JSON.stringify on the data since localStorage saves everything as strings.
src\app\store.js
store.subscribe(() => {
    const { favourites, siteSettings } = store.getState();
    localStorage.setItem('favourites', JSON.stringify(favourites.value));
    localStorage.setItem('scheduleFilter', JSON.stringify(siteSettings.scheduleFilter));
    localStorage.setItem('country', JSON.stringify(siteSettings.country));
});
Any time my Redux store is updated, localStorage is updated as well. This is important so my temporary state (Redux ) and my permanent state (localStorage) are kept in sync with each other.
Lets hop back to talking about Redux and slices...
Favourites Slice
Slices are Redux Toolkits way of writing all your reducer code neatly in one file. Let's take a look at the slice for favourites which handles storing all the favourite information:
src\features\favourites\favouritesSlice.js
import { createSlice } from '@reduxjs/toolkit';

const favouritesData = localStorage.getItem('favourites')

const initialState = {
	value: favouritesData ? JSON.parse(favouritesData) : [],
};
I have some initialState which is an object that is used later in the actual slice (see below). This object has a value which gets the result of checking localStorage to see if a 'favourites' item exists. If it does exist, JSON.parse the data from a string back into an object we can work with in JavaScript. If it doesn't exist, it simply gets an empty array instead.
export const favouritesSlice = createSlice({
  name: 'favourites',
  initialState,
  reducers: {
    addFavourite: (state, action) => {
      state.value.push(action.payload);
    },
    removeFavourite: (state, action) => {
      state.value = state.value.filter(show => show.id !== action.payload)
    },
  },
});

export default favouritesSlice.reducer;
Then we declare the favouritesSlice using the createSlice function and pass it an object. We give it a name so Redux can identify it. We pass in our initialState from earlier, which will either be an empty array, or it will contain an array of favourites from localStorage.
Then we write the reducers. This is an object, with each item being the action we want to carry out whenever we want to update the state in our application.
- The first one is called
addFavourite. This is a function that takes the current state and an action, it then mutates the state value with the payload. The payload is basically the value we want to add to the state, which in this case is another tv shows data to be added to the favourites list. - The second reducer is the
removeFavourite. This one takes state and action again, but this time it uses an array.filtercommand to mutate the state and return shows that don't match the payload. The payload is a tv show which we want to remove from the list of favourites.
export const { addFavourite, removeFavourite } = favouritesSlice.actions;Here we are exporting those reducers so they can be used in any other component throughout the application to add and remove items from state for favourites.
export const selectFavourites = (state) => {
  const favs = [...state.favourites.value]
  return favs.reverse()
};
Lastly, to wrap up this slice, we export a selector which will allow any other component throughout the application to get the current favourites held in Redux.
Before I return the value, I did a simple reverse of the array, so the user gets their favourites list in order of newest first.
Managing routes with React Router
React creates SPA (single page apps), which means the whole website is delivered from the index.html
When you click on links in your website, those parts of your website load immediately since your browser doesn't have to go back to the server to request a new webpage.
One downside to this is the initial load of the website takes longer since you're downloading the whole website. There are ways to code split your app so you don't have to load everything at once, but I'll save that topic for another article.
If you want to make use of a folder structure with your website URLs, as well as things like the browser history then React Router is here to help.
src\App.js
import React from 'react';
import { Route, Routes } from 'react-router-dom'

import { Header } from './features/header/header'
import { Home } from './features/home/home';
import { Search } from './features/search/search';
import { Favourites } from './features/favourites/favourites'
import { Show } from './features/show/show';
import { Episode } from './features/episode/episode';

function App() {
  return (
    <>
      <Header />
      <Routes>
        <Route path="/" element={<Home />} />
        <Route path="/search" element={<Search />} />
        <Route path="/search/:query" element={<Search />} />
        <Route path="/show/:id" element={<Show />} />
        <Route path="/episode/:id" element={<Episode />} />
        <Route path="/favourites" element={<Favourites />} />
        <Route path="*" element={<Home />} />
      </Routes>
    </>
  );
}

export default App;
Above we can see two components from React Router being used:
<Routes />which allows us to define a group of routes, React Router will pay attention to.<Route />which allows us to define these paths, the URLs of our site, and the react component that should be shown for that path.
For example, there is a <Route /> component setup with a path="/favourites" and an element={<Favourites />}. So when a user visits the favourites page: https://co-tvfavs.netlify.app/favourites, React Router now knows to show the Favourites component on screen.
In addition to that <Favourites /> component, there is the <Header /> component which sits outside of the <Routes /> component. This Header component contains the logo, 'my favs' button and 'search shows' search bar. Because it's outside of <Routes />, this means it will always be visible on screen no matter which route the user happens to go to.

This works great as a persistent part of the site that I don't have to add to every single component. It's always there.
React Router has many great features, like nested routes, a variety of powerful hooks as well as the ability to handle...
Dynamic URLs
When visiting the search, show or episode routes, I needed to pass over things like the search term, show ID or episode ID in the path so the next component could use that value to query the TV Maze REST API.
We can see how that is done looking at one of the routes, which passes an :id value at the end of the path:
<Route path="/show/:id" element={<Show />} />And in the <Show /> component which is the "page" that displays show information, I can use React Router DOM to get that id value using useParams() like so:
const { id } = useParams()Time to get some TV schedule data!
On the homepage I want to show users the TV shows airing tonight between the hours of 8pm and 11pm:
const getScheduleData = () => {
  axios.get(`https://api.tvmaze.com/schedule?country=${country}`)
    .then(function (response) {
      setSceduleData(response.data)
      processSceduleData(response.data)
    })
    .catch(function (error) {
      console.log(error);
    })
}

useEffect(() => {
  getScheduleData()
}, [])
I wait for the page to finish loading with the useEffect, then call the getScheduleData function to make an Axios call to the API, querying TV MAZE's end point for schedule. The Axios URL is a template literal adding in the country value, which is stored in Redux, at the end of the URL.
Once the data comes in successfully, I set some state and pass the data on to the processSceduleData function which loops through all the shows to find out what time they are airing tonight so I can split them into the 8pm, 9pm and 10pm groups.
I have to do this since the API doesn't let you request specific times, it only returns a full days tv schedule. So I have to do the work of sorting out the hourly time periods from the data.
I also check if each show is already in the users favourites by checking the ID and push this to an array. I have a toggle at the top of the schedule to allow the user to switch between all the shows and just the user's favourites.
const processSceduleData = (data) => {
  if (!data) return

  const tempTimeSlot20AllShows = []
  const tempTimeSlot21AllShows = []
  const tempTimeSlot22AllShows = []
  const tempTimeSlot20Favs = []
  const tempTimeSlot21Favs = []
  const tempTimeSlot22Favs = []

  data.forEach(show => {
    // get hour as a number from string "20:00" to test hourly boundaries
    const showAirTimeStart = returnAirTimeStartHour(show.airtime)
    const showId = show.show.id

    if (showAirTimeStart >= 20 && showAirTimeStart < 21) {
      tempTimeSlot20AllShows.push(show)
      if (isIdInFavourites(showId)) tempTimeSlot20Favs.push(show)
    }
    else if (showAirTimeStart >= 21 && showAirTimeStart < 22) {
      tempTimeSlot21AllShows.push(show)
      if (isIdInFavourites(showId)) tempTimeSlot21Favs.push(show)
    }
    else if (showAirTimeStart >= 22 && showAirTimeStart < 23) {
      tempTimeSlot22AllShows.push(show)
      if (isIdInFavourites(showId)) tempTimeSlot22Favs.push(show)
    }
  })

  setTimeSlot20AllShows(tempTimeSlot20AllShows)
  setTimeSlot21AllShows(tempTimeSlot21AllShows)
  setTimeSlot22AllShows(tempTimeSlot22AllShows)
  setTimeSlot20Favs(tempTimeSlot20Favs)
  setTimeSlot21Favs(tempTimeSlot21Favs)
  setTimeSlot22Favs(tempTimeSlot22Favs)
}
Now all the data has been processed and saved out in to arrays, I can easily .map over these arrays and use a component to list the TV shows to the user:
{timeSlot20.length > 0 && (
  <AnimateFadeInWhileInView>
    <TimeSlotHourHeading>
      20:00
    </TimeSlotHourHeading>
  </AnimateFadeInWhileInView>
)}
{timeSlot20.length > 0 && timeSlot20.map(episode => (
  <ShowLink
    key={episode.id}
    showData={episode}
    destination={`/episode/${episode.show.id}?season=${episode.season}&episode=${episode.number}`}
    favBtnAction="toggle"
  />
))}
AnimateFadeInWhileInView is a wrapper component that I use to handle my Framer Motion animations which I'll talk more about later. TimeSlotHourHeading is a Styled Component to style the pink bar that identifies the hour.
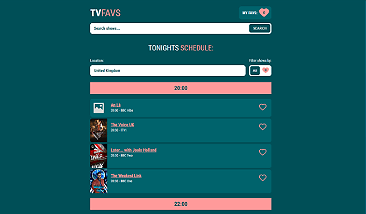
ShowLink is a component that shows an image of the show, the show name, air time and channel name. It has a heart icon to display if the user has added that show to their favourite list or not. Clicking it takes you to the episode page.
The destination prop is a template literal to create the URL the link goes to. It also contains a query string to pass over the episode season and episode number values so the episode page can use that information to query the API for the episode data.
Here is a screenshot of a bunch of ShowLink components on the website:

If the user was to press the "filter shows by:" toggle at the top of the schedule list, then the view would update immediately and show only their favourite shows airing tonight:

Viewing an episode page
The user clicks on the show they like the look of and they are taken to the destination URL (https://co-tvfavs.netlify.app/episode/45646?season=3&episode=1) we saw above in the ShowLink
component, to a page that looks like this:

Another axios call is made to the API. This time to their episode endpoint, using the show ID 45646, the season (3) and episode (1) values from the URL.
DOM Purify to cleanse the HTML
Amongst the episode data returned, I get the episode description, which is some rich text HTML. So for security, I use DOM Purify to cleanse the HTML just in case TV Maze gets hacked and some nasty HTML comes my way.
I don't want to be passing that on to my users!
Animations with Framer Motion
Framer Motion is a fantastic library that allows you to quickly add props to components to achieve some great animations in a really short amount of time.
I have used Framer Motion throughout the whole of the website, to do a bunch of nice animations for each of the page elements. Doing so brings the page to life and improves the overall user experience of the website.
I have created an AnimateFadeInAndUp wrapper component that I can quickly wrap around any component in the app to achieve a fade in and move up animation:
<AnimateFadeInAndUp>
  <Title>
    Tonights <span>Schedule:</span>
  </Title>
</AnimateFadeInAndUp>;
You can see the component below and how I pass it the children, a delay if I want one, and callback if I want to do something after the animation finishes:
export const AnimateFadeInAndUp = ({ children, delay, callback }) => {
  return (
    <motion.div
      initial={{ opacity: 0, y: 15 }}
      animate={{ opacity: 1, y: 0 }}
      transition={{
        ease: "easeInOut",
        duration: 0.4,
        ...(delay && { delay: delay }),
      }}
      onAnimationComplete={callback}
    >
      {children}
    </motion.div>
  );
};
All I need to add to the div is the 'motion.' so Framer Motion can recognise it and apply the animations.
To configure the animation, you can pass an initial prop, which takes an object, where I set the opacity to zero so you cant see the element. I also move it 15 pixels down on the Y axis.
Then the animate prop sets the values of how the animation will finish, setting the opacity to one so the element is visible and the Y to zero.
The transition prop allows me to set some configuration for the animation like the easing, duration and I conditionally spread in the delay if the component happened to recieve a delay or not. onAnimationComplete is a Framer Motion event that triggers my callback after the animation.
The benefit of making this AnimateFadeInAndUp component means:
- I have a reusable component I can use any time I want to achieve this common type of animation
- It achieves consistency across my website
- If I need to adjust the animation, I can change it in one place and it will update in all the places
- I have the power to configure the component with further props, beyond just the animation
There are several alternatives to Framer Motion, and one of them is the Greensock Animation Platform (GSAP) which I also love to use. I'm sure it will feature in other blog articles I write soon.